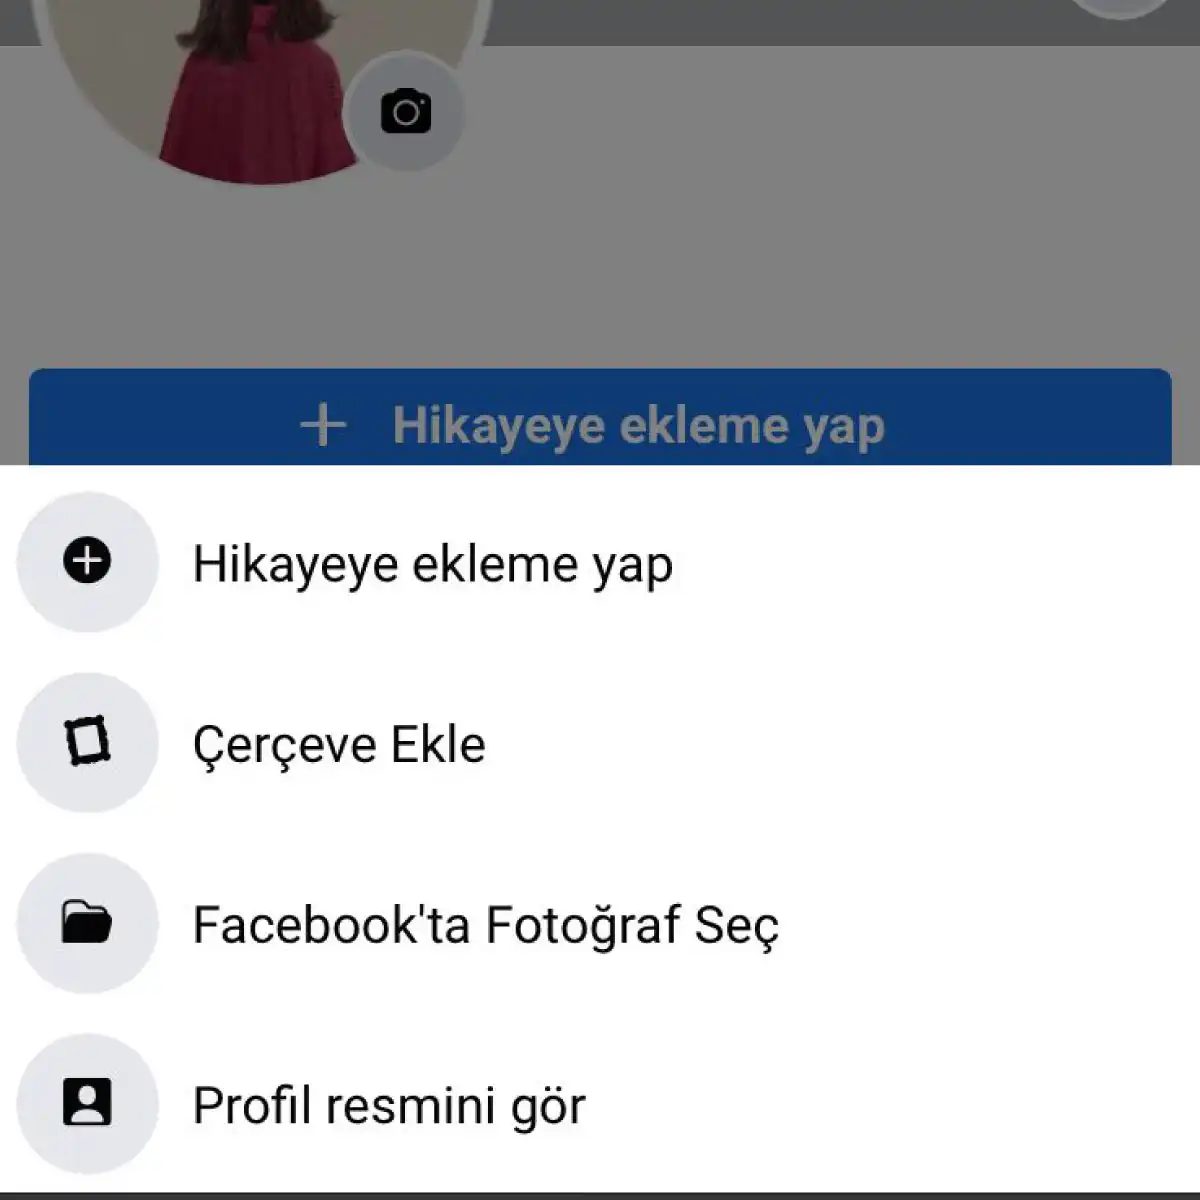
Facebook still has a huge user base. It maintains its place in social networks. What about your profile? That round circle. It’s the only thing that represents your face or your logo when you interact with people. Sometimes a still photo is not enough. It could be his birthday. There is an awareness campaign. Or you just want to make a temporary change for an event. Facebook made this possible. The Facebook temporary profile picture feature meets exactly this need. You don’t need to delete your still photo. You’re just adding a layer on top of it. You can remove it if you want. The process is simple. But knowing the details makes your job easier.
What is a Temporary Profile Picture and Why is it Important?
This feature adds a non-permanent image layer over the profile photo. The original version of the main photo is preserved. It’s just a change that catches the eye of visitors. Why is it used? To support social events. For campaign promotion. Or in a moment of personal celebration. Most people confuse this with “Cover Photo”. Wrong. The cover photo is in landscape. The profile picture is circular and appears everywhere. On messaging screens, in comments, next to the friends list… Everywhere. So it creates a more personal connection.
How to Install Step by Step?
The process is similar via the mobile app or desktop browser. Here’s the path you should follow:
- Open the Facebook app. Click on your profile photo.
- Find “Add Temporary Profile Picture”. This can often be marked with a pencil or “+” symbol on the photo.
- Select an image from your device.
- Move the image to the desired position by scrolling or zooming. Facebook fits this image into a circular frame.
- Click the “Save” or “OK” button.
The change is reflected immediately. Other users see the new image when they visit your profile.
Duration and Removals
One of the most important questions: “How long will it last?” Facebook doesn’t do this automatically. After uploading the image, you check it. You can take it back whenever you want. How? Just click on your profile photo again. This time the “Remove Temporary Profile Picture” option appears. Clicking it will return your original photo. All changes are reverted. This feature allows you to experiment without having to make a permanent decision.
What Images Are Appropriate?
Not every photo will work here. Copyrights are important. Facebook, copyrighted
You may want to instantly change who you are on Facebook. Maybe you’re supporting an event, or maybe you just want to take a break from your profile. In this case, before making a permanent change, adding a temporary profile picture can be a lifesaver. Let’s examine the process step by step.
Login and Access Profile
It all starts with logging into your account. Go to www.facebook.com from your browser. Sign in. Click on your profile photo or name in the upper right corner. Select “Edit Profile” from the menu that opens. Simple, right?
Find Temporary Option
Look carefully at the main photo on the profile editing screen. You can see a small arrow or gear icon in the upper right corner of the image. It’s there waiting for you. When you click on it, click on the “Change Profile Picture Temporarily” option in the menu that appears.
This step protects you from the trap of making permanent changes. Because this option keeps the image active only in your current session or for a certain period of time.
Upload and Edit Image
A new window opens. Now it’s time to choose which image will be your temporary identity. If you want, upload a new photo from your computer. If you want, use one of your albums that already exists on Facebook.
Don’t stop once you’ve made your choice. This is where Facebook’s tools come into play.
– You can crop the image.
– You can apply filters.
– You can even add simple texts on it.
When the changes are finished, press the “OK” or “Save” button.
Result: Instant Change
Whether you clicked or not. The Facebook system automatically sets this image as your temporary profile. If you refresh the page or log in with another account, the image remains there. Your friends and other visitors see this new face when they visit your profile.
Why Use Temporary Profile Picture?
Let’s get back to the question. What is a Facebook profile picture? In fact, rather than standard biographical data, it is a visual representation of your current mood or stance.
The strength of the temporary feature is flexibility. You can join a campaign or simply create a different atmosphere without having to make any permanent changes. What happens when you’re done? You can usually revert back to your original photo or remove the image. This is the fastest way to communicate without leaving a trace on your digital identity.
Stopping every now and then to review your profile, as if you were a digital

Facebook profile picture is not just a photo. Your account ID. It appears on your timeline, in your news feed, and even next to your comments. If people know you, that shot will do its job. But you don’t always have to keep a fixed image.
Facebook offers its users a special tool: temporary profile picture. This feature allows you to update your profile picture with another image for a certain period of time without changing it permanently. It is especially useful on special occasions, awareness campaigns or when you want to announce a social issue you support. You can temporarily change your profile photo to deliver your message to a wider audience.
Why Use Temporary Profile Picture?
Because sometimes your message goes beyond a standard photo. You are running an awareness campaign. You want to support a worthy cause. Or you just want to celebrate a specific date and put a special emphasis on that day. Temporary profile picture is an ideal solution in this case. There is no need for a permanent change. Just attracting attention for that moment is enough.
Users generally prefer this feature when:
- Special days and celebrations
- Social awareness campaigns
- Announce a supported issue
- Emphasizing a personal or corporate event
Constantly changing your profile picture can be distracting. But a temporary update gets your message across and provides consistency across your profile. People recognize you. But he also sees what you’re talking about.
How to Set and Remove?
Setting a temporary profile picture is simple. It can be done from the Facebook app or desktop version. The picture is selected. The duration is determined. The process is completed. But remember. This change only applies to your profile picture. It does not affect your cover photo. You will not receive a notification to your friends list. Only your profile is updated.
When the time expires, the picture automatically returns to its previous state. No need for manual intervention. Thus, the risk of forgetting is eliminated.
In Which Situations Should It Be Used?
Not every image is always appropriate. For an important campaign, using a temporary profile picture can be effective. But trying to make a permanent change for a personal moment can create inconsistency in the eyes of your followers. The temporary profile picture is a strategic tool. It should be used with caution.
For example, using a temporary image can be heartfelt when celebrating a birthday. But constantly changing profiles can create trust issues. It is necessary to be balanced. Your message must be clear. The visual should also be suitable for this.

Deleting temporary profile pictures seems difficult, but it’s actually very simple. You can get it back to its old state with just a few taps. So why should you uninstall it? Maybe you don’t want to support that campaign anymore. Or maybe you just want to get rid of that old holiday image hanging on your keychain. Inevitably, the process is the same.
Why Use Temporary Images?
First of all, it might be helpful to remember why you’re installing them. There are several benefits to using a temporary profile picture and they are mostly emotional or social.
- Awareness: To draw attention to a social issue.
- Support: For sports teams or events.
- Celebration: For birthdays or holidays.
However, these images should be deleted when they expire or your intentions change.
How to Remove Facebook Temporary Profile Picture?
The process varies slightly depending on the device you upload the image to. If you’re using iOS, Android or desktop, the steps are separated by small nuances. Here are the details:
Deleting from Desktop
- Log in to your Facebook account.
- Click on your profile picture.
- Press the “Edit Profile” button.
- In the window that opens, click “Pencil” (edit icon) in the “Profile Picture” section.
- Click “Remove Photo”.
- Save changes.
Deleting from Mobile App (iOS and Android)
- Open the Facebook app.
- Tap your profile picture in the bottom right (iOS) or top/bottom menu (Android).
- Find “Edit Profile”.
- Tap your profile picture.
- Press the “Remove Photo” button.
- Save the settings.
“Does removing the image mean deleting all past interactions?” No. Old comments and tags are preserved, only the foreground image changes.
Common Errors
Most users make the biggest mistake when doing the “Facebook temporary profile picture removal” process. Instead of deleting the image, it tries to replace it with an incorrect image. This leaves an unnecessary visual residue. The correct way is to directly use the “remove” option.
Also, in some cases the changes are not reflected immediately. Cache problems may occur. In this case, closing and reopening the application often finds the solution.
**Why Should We Remove It Now?

The temporary photo on your profile no longer takes up space. Was there a momentary error or an accidentally uploaded image? It’s not hard to get it back. Let’s proceed step by step.
First you need to log in to your Facebook account. This is a basic but often overlooked step. After logging in, go to your profile. Click on your initials or current profile photo. This is a quick way to settings.
The profile editing screen will open. Be careful here. Hover your mouse over your profile picture. A small menu appears. Click “Change Profile Picture”. In some interfaces, this option may be in different places, but the logic is the same.
There are installation options in the window that opens. What you’re looking for is “Remove Temporary Profile Picture” or something very similar. Select this option.
Finally, just press the “OK” or “Save” button. The process is ending.
Note: If you forget to save changes, your changes will be deleted. Always press the end.
What happens when the temporary image is removed? Your profile returns to its default state. If there is no previous private photo, Facebook’s default silhouette or your previous static photo will be restored. This is a good stance to protect your privacy.
Why would you do such a thing? Maybe you installed it for trial purposes. Maybe system error. It doesn’t matter why. The result is this: The photo is gone. Profile is clean.
Similar logic applies to other temporary settings. The interface may change, but the functions are constant. Always look for the button at the bottom to register.
Is there a forgotten detail? Yes. If you’re using a mobile app, the menus may be a little more hidden. But the process is the same. Profile -> Edit -> Photo -> Remove.
After all, you are in control. It’s up to you to edit its appearance. The rest is just infrastructure.



Facebook’s photo editing feature isn’t just about cropping frames. In fact, these tools also come into play to personalize your temporary profile pictures. Either add a filter or write text on it. The result is always a more original look.
No Limitations in the Process
Many users think that the platform restricts this feature. They are wrong. Facebook does not impose any limit on the use of temporary profile pictures. You can change it whenever you want.
You can use a temporary profile picture as often as you want.
This flexibility is a great advantage for those who want to update your profile according to seasonal changes, events or just your mood. One day it’s a black and white portrait, the next day it’s a vibrant color icon. All are allowed.
When to Remove?
One of the most frequently asked questions is: “How long does it stop?” The answer is simple. It’s entirely up to you. There is no time limit.
When you want to change your profile picture back to your original photo, simply remove the temporary picture. The process ends with one click. This flexibility is ideal for sudden concept changes.
Visibility and Access
One of the really curious parts is: “Do my friends see this?” Yes. The temporary profile picture becomes available to everyone who visits your profile.
People on your friends list will see this new image in your news feed and timeline. Instead of the profile photo they normally see, the temporary version you choose will stand out. This is a feature that increases instant interaction. However, there is one point to note: This change is only temporary. Your original photo is waiting safely in the background.
Editing Tools and Features
There’s no need to download an external app to customize the temporary profile picture. Facebook’s own built-in image editing tools are designed exactly for this job.
Which tools come in handy?
– Cropping: Removing unwanted parts of the photo.
– Filters: Changing the atmosphere, adjusting the colors.
– Adding text: Writing a short message or date on the photo.
These simple tools are enough to turn a standard square into an interesting visual. Especially the text adding feature offers a practical solution for your announcements.
Why is it important?
This feature is a lifesaver when you need to instantly reflect your digital identity.