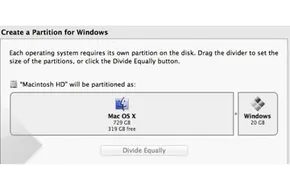
Boot Camp Assistant doesn’t play nice with defaults if you want actual performance. By default, it carves out a measly 42 GB for Windows. The rest goes to macOS. You can see this immediately in the partition slider. Drag the grey dot. Adjust the split. But don’t get greedy.
Apple officially recommends at least 64 GB for a bare-bones Windows install. 128 GB is the sweet spot for a usable experience. These numbers are for the OS alone. They don’t account for the software you actually need. If you’re running productivity tools, drivers, or niche utilities, that 64 GB vanishes fast.
Consider gaming. If you’re loading World of Warcraft, you need more than just the OS. The game’s minimum requirements add roughly 25 GB. Then there are expansions. Then save files. Then patches. That slider needs to reflect reality. Add that space to your Windows partition. Otherwise, you’ll be deleting games to install updates.
But here is the trap: shrinking Windows doesn’t just help you. It hurts your Mac. The slider shows available macOS space in real time. Boot Camp Assistant blocks you from going below 8 GB on the Mac side. Hard stop.
8 GB is enough to boot. It isn’t enough to live. You need that space for music edits. Video exports. System updates. Photos. If you’re a creative professional, 8 GB is a death sentence. You’ll fill it before lunch.
So, do the math. Start with your Windows needs. Add buffer for apps and games. Then look at the Mac side. Is there room for your actual workflow? If not, resize. Or don’t install Boot Camp. It’s better to have a slow Mac than a broken one.